Custom Printing 101
First off, if you have read previous blogs, you have read all about the benefits of combining print marketing with digital marketing and how it increases ROI. You can go to previous blogs to learn all about the benefits of Print Marketing and

ROI. The goal here is to explain custom printing and walk you through every step. Sadly, we as humans, are often intimidated by that, which, we are not
familiar, people often feel uncomfortable placing an order and asking questions. Ultimately, we are here to answer your questions, and we hope you take advantage of this blog to help answer some questions. We will try to help explain certain attributes and attempt to help give suggestions.
Step 1: In the beginning there was…
It turns out that you need to have calendars printed for your company or to give as a business partner as a gift. Or you are opening a restaurant and need menus. Perhaps, you have a big presentation coming up, and you need presentation  folders to hand out so everyone is on the same page…literally. Either way, you need something printed. Naturally, your next thought is: Let me contact The Marsid M&M Group, everybody knows they’re the best. Ok, so that last part may not have happened, but let’s assume it did. From this point, I am going to assume that you are putting an order through online because if you call us, our print specialists can answer all your questions over the phone. Or, you can read this blog, and then call in and act like you’ve been printing projects for 30 years.
Step 2: Paper weighs 100 lbs?
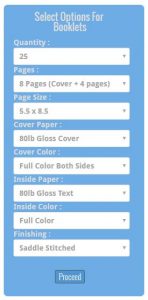
You arrive at our site and choose which item or items you need to be printed. Once, you are on that item\s page, there is a box on the right-hand side that needs to be filled out. This is the point in the process, where
many feel overwhelmed or get confused. Some of the terms may sound unfamiliar.
As you see, I have selected booklets for this item. We first decide on the quantity of our printed item. Next, we come to Pages. This can get tricky. Printers do not count the number of pieces of paper. We count pages as a book does, including the cover. So, a cover is 4 pages, the front cover, the inside jacket, the rear jacket, and the back cover. A book with a cover and 75 pieces of paper in between is in printer’s terms, 150 pages plus cover. We number every surface area. Next, is the page size. This is the actual size of an individualized numbered page. Or the size of the cover, (unless the inside and outside are different sizes). Any product that has a cover and inside pages will require the type of cover paper and the type of inside paper. Normally, you would choose cover stock for a cover and text stock for the inside pages. You will also have to choose the color of the cover, inside and out. For printers, any color is full color. You can choose black ink, or leave it blank. For a cover, you may choose full color on the front and black ink on the inside. Next, you must choose the color of the inside pages. Remember again, if 1 page has color on it, then the inside pages are full color. Lastly, we come to how the booklet is bound. For a booklet, there are 4 different binding options. Saddle stitching, which is like a magazine, the pages are simply stapled or stitched together. Spiral bound, like a school notebook. Wire O bound is like spiral except that it is not continuous. It is a number of individual wired loops that are perpendicular to the edge of the page it is binding. Lastly, it can be perfect bound, which is like a normal paperback book. There are page limits and requirements for binding. You can call us to ask, or when the quote is put through, we will let you know what your options are.
Step 3
Once you have been assigned a print specialist and receive your estimate, you may go over any additional questions that you may have and review the pricing. At this point, you want to make sure your artwork is done and is a Print Ready PDF. We also have a blog post that explains how you can use a free piece of software to design your artwork if you haven’t already created your artwork.

After you made sure your artwork is ready for printing you can simply click the blue Order Now button at the bottom of your estimate which will bring you to the order form that is customized for you.
Next, you will come to where you provide us with your billing and shipping info so that we can get your final printed project to you in a timely manner. As you can see you are given 3 options for completing your order. One being complete order and upload file (The option you are most likely going to want to choose), Complete order and upload files later (Only select this if you do not have your files yet), and complete order and use previously uploaded files (Use this if it is a reprint or if we already have your artwork).
Step 4
Now that have completed your order you should receive a low-res proof soon of what your artwork will look like when printed. If everything looks correct you can approve it. Next production is started and when it is completed you will receive an email with tracking for your package.
Now that you know the basics to getting custom printing head over to the Marsid-M&M Group and have it printed right the first time with customer service experts!


Leave a Reply